If you've done any server-side development, or used one of the multiple CMS platforms available, you know that a custom database can be a powerful tool to use. And HubSpot's HubDB is that flexible database element you have in your HubSpot CMS site. While not without its limitations, it can still be flexible, powerful, time saving tool to use (even with the starter CMS that doesn't support the dynamic CMS page option.)
Uses
 HubDB tables give you a central location to store and manipulate data. Since the data isn’t tied to a specific page, it can be flexible and used to display the same (or a subset of data) on many different pages…
- A resource system or case studies: Have rows of content/downloadable files/images. An end-user may search for data of interest to them and see matching results.
- A repository of data you want to use on multiple pages like customer quotes, partner logos, etc.
- Store products that can be organized and displayed by multiple criteria such as categories, colors, sizes, etc.
HubSpot Limits
For users coming from MySQL/MSSQL databases, HubDB tables do have a couple of limitations you should be aware of before committing to their use in your project:
- 1,000 HubDB tables per account. It’s unlikely that you will run into this, unless you have a massive project, 1,000 tables represent a lot of storage.
- 10,000 rows per HubDB table. This is a bit more limiting. A resources storage or tables mirroring other HubSpot items (contacts, pages, etc.) could easily have more than 10,000 rows. So, if you need to store massive amounts of data, you’re probably using an external database and reading/writing data using DHTML and the HubSpot APIs.
- 10 table scans per CMS page. So, you may only query your HubDB tables 10 times per page build.
Creating the Table
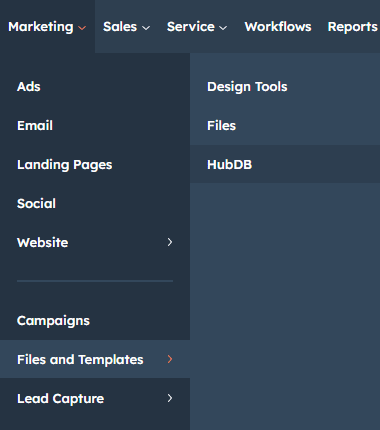
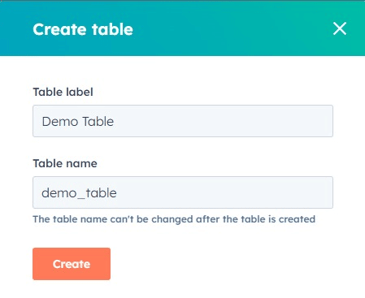 Assuming you can work within those limits, the next step is to create a table. We’ll talk about the HubSpot native UI. From the Marketing Menu, open the Files and Templates and select the HubDB from the popout. This is the main HubDB area for your site; all existing tables will also be listed here. Click the Create button in the upper right corner to start the table creation. You’ll be asked to give your table a Label (the name you’ll see in the list of your HubDB tables) and a Title (the internal name of the table; this cannot be changed once the table has been created.)
Default Columns (Fields)
Every HubDB table will start with two columns you can see:
- ID: this column is a fixed, unique identifier for each record in your table. It can’t be deleted and is automatically populated for you, so you can’t change its values.
- Name: this field is automatically created for you. Chances are your data will have a name or title of some sort, so feel free to reuse it (by default, it’s a text field.) If you really don’t need it, you can delete it.
There are a few more columns created you can’t see, but could be useful:
- hs_created_at: the date/time the row was created.
- hs_updated_at: the date/time the row was last updated.
- And a few fields if you plan on using the table to populate dynamic pages; more on that in a later post…
Adding New Columns (Fields)
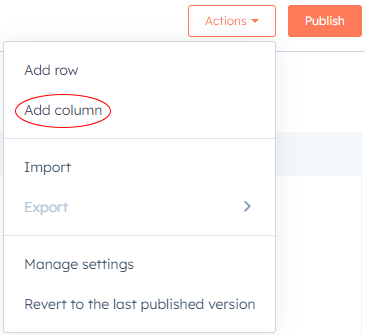 Obviously, you will want to add additional columns (or fields) to your HubDB to store your data. These fields are the same for all rows in your table (i.e., a row of data in the table will have a column to store the data, even if a row may not have any data for that field. To add additional columns to your HubDB table, select the Add column item from the Actions menu while in your HubDB table.
Columns will have a:
- Label - what the user sees when entering the data
- Name - the internal HubSpot name you will use when referring to the column
- Description - a brief description for the user entering the data so they know exactly what you want entered in the field
- Type - the type of content you intend to store in the column
 Columns within the table are designed to store different types of content. These differences can be useful to make sure that the person populating your data knows what you intend (give them an image field rather than a URL or text field to make sure they upload an image and don't store a URL to page.)
We won’t cover all the types, but will highlight some of the more common/useful ones here:
- Text – Single line of text (although will store up to 10,000 characters)
- Rich Text – Rich Text content (with the WYSIWYG editor, similar to the Rich Text object on a page)
- Image – An image from the HubSpot files
- Select/Multi-Select – Choose from options you enter when creating the column.
- Checkbox – A single yes/no (on or off) element
- Location – an address or latitude and longitude. The map is there to confirm the location; you cannot drop a pin on it like other maps. And, even if you use the address to find the location, the latitude and longitude are the only things stored.
- Foreign ID – If you have multiple HubDB tables, you can select another table and it’s representative column. You are then able to link this field to one or more rows in another HubDB table. (The other table must already have data and be Published for it to properly appear.) This can be very useful if you will have data in your table that is used by other tables (like a category or type) or want to link another row in another table to reuse its data in your current row without re-entering it (like an image with a title and description).
Changing Column Labels and Names and Column Types
It is possible to change the label and name of existing rows. However, be careful when changing the name of the item; that’s what your code will use when referring to the column in the table and may need to be updated elsewhere; more on that later. The label may be changed without any dependency concerns. But, changing the data type of the row is not always possible. While you can change text to rich text (and vice versa) you may not change text to images, select, numbers, etc.
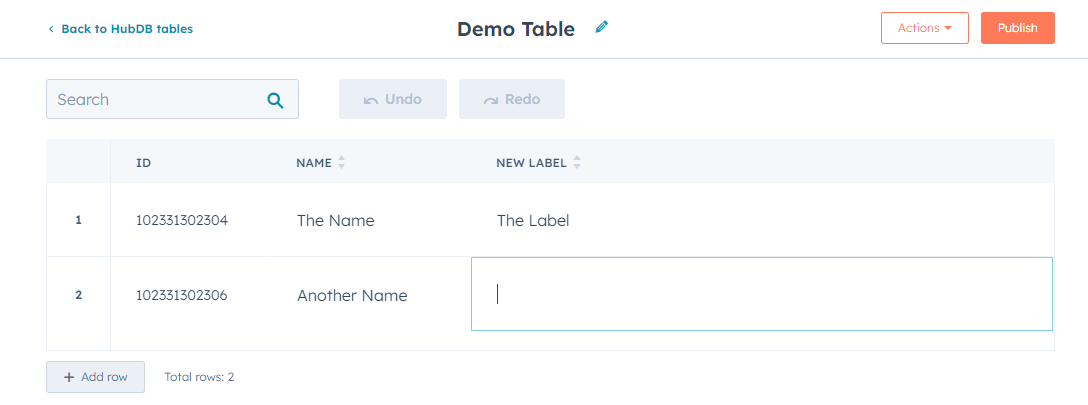
Adding Content
After all the rows have been created, you are ready to add content. Note that you may add and edit rows after you have already content. You are able to click and add/edit content directly in the HubSpot HubDB table interface; type data in the fields, click to add elements, etc.
Exporting and Importing
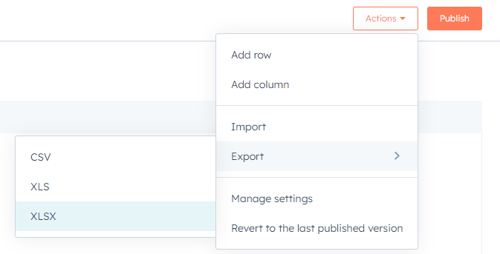 But, if you have several rows, you may have to scroll left and right in order to see all the data. It could be easier to export the data to csv/xls/xlsx and edit the data outside of HubSpot, and then import the revised data. If you do this, you must be careful to make sure that the data in the rows matches the type of data HubSpot will expect to store (a latitude and longitude for a location, a local URL of an image, etc.).
Publishing Your Table and Data
 When you have data entered in your HubDB table, you must Publish the table for any users (or API calls) to see your new data. And while you can revert your table to “the last published version”, you will lose any of your new rows. And this history only reverts to the last published content; there is no history of previous published versions.